
Jump to Step # Intro 0 1 2 3 4 5 6 7 8
Step 7: Setting up the Cel Shading
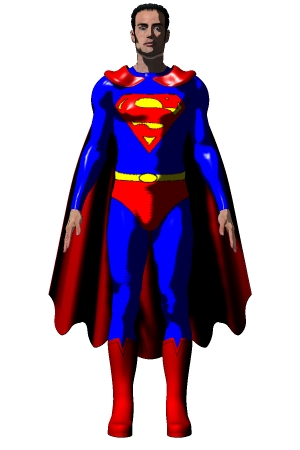
Okay, now we get to the real meat of the tutorial: setting up the cel shading. For this, let's go back to our Superman project:

We are going to set up the cel shading for Michael in multiple steps: the Body, the Head, the Eyes and the Teeth. Each of these groups has a different texture map which is while we'll do them in these groups. We'll be setting up all of the materials in each of these groups in the same way and while tedious, it will be fairly quick to set up.
Step 7-A: Setting up the Cel Shading for Michael's Body
In this step, we are going to set up the cel shading for the materials for Michael's body: Fingernails, Nipples, SkinArm, SkinFeet, SkinForearm, SkinHand, SkinLeg, SkinNeck, SkinTorso and Toenails.
To do this, we are going to set up the SkinHand material and then copy and paste is into the other materials. You might want to use the Right Hand Camera to get a better view of the hand as we do this.
Let's set up the node tree first and then I'll try to explain how it works.
Go to the Materials Room and select the SkinHand material on the Michael 3 model:

Let's start by unplugging the texture map from the Diffuse_Color socket. To do this, right-click on the Diffuse_Color socket and disconnect the Image_Map.
We're going to use this Image_Map in a few minutes, so let's just move it to the side for now:

Create a Color_Math node. Set the Math_Argument to Multiply. Set both Value 1 and Value 2 to pure white.

Plug this Color_Math node into the Alternate_Diffuse socket on the PoserSurface node and set the Diffuse_Value to 0:

Create another Color_Math node (which will be named Color_Math_2). Set the Math_Argument to Step. Set Value 1 to gray (red, green and blue all set to 128) and Value 2 to pure white:

Plug this Color_Math_2 node into the Value 1 socket of the Color_Math node:

Create an Edge_Blend node. Set the Inner_Color to pure white. Set the Outer_Color to pure black. Set the Attenuation to 0.4:

Plug this Edge_Blend node into the Value 2 socket of the Color_Math_2 node:

Create a Toon node. Set the LightColor to pure white. Set the DarkColor to gray (red, green and blue all set to 128). Set the InkColor to pure black. Set the Spread to 0.1 and the LineWidth to 1:

Plug this Toon node into the Value 2 socket of the Color_Math node:

Plug the Image_Map node (that we disconnected from the Diffuse_Color socket above) into the LightColor, DarkColor and InkColor sockets of the Toon node:

Okay, what does this do and how does it work?
There are two parts to the tree. One part does the edge lines and the other part does the "interior" coloring of the figure.
The part that does the edge lines is comprised of the Edge_Blend node, the Color_Math_2 node and the Color_Math node. The Edge_Blend node creates the lines at the edges of the figure using the Outer_Color. This value is then passed into the Value 2 socket of the Color_Math_2 node. If this node returns a 0 if Value 1 is less than Value 2 and 1 if Value 2 is greater than or equal to Value 1. This is then sent into the Value 1 socket of the Color_Math node and is multiplied by Value 2. The output of this is sent into the Alternate_Diffuse socket of the PoserSurface node.
The part that does the "interior" coloring is comprised of the Image_Map node, the Toon and the Color_Math node. The Image_Map node is our texture map. This value is then passed into the LightColor, DarkColor and InkColor sockets of the Toon node. This "flattens" the colors to more of a cel shaded style. The result of this is then feed into the Value 2 socket of the Color_Math node and is multiplied by Value 1. The output of this is sent into the Alternate_Diffuse socket of the PoserSurface node.
Compare the two renders: | |
 |  |
Normal Poser 5 Render | Cel Shaded Poser 5 Render |
(Add some comments comparing the two renders here.)
To set up the cel shading for the other regions in this group (Fingernails, Nipples, SkinArm, SkinFeet, SkinForearm, SkinLeg, SkinNeck, SkinTorso and Toenails): right-click on the PoserSurface node and then Shift-right-click on each of the other nodes, once all of them are selected, right-click on one of them and select Copy from the pop-up menu. Switch to each of the other material regions and remove the Image_Map node and then Paste the node tree into that material. Repeat for each material in this group.
Save point: Tutorial-Step7A.pzz = ???? KB
| Main Camera | Aux Camera |
|---|---|

|

|
| Face Camera | Right Hand Camera |

|
|
Step 7-B: Setting up the Cel Shading for Michael's Head
In this step, we are going to set up the cel shading for the materials for Michael's head: EyeSocket, Lacrimal, Lips, Nostrils, SkinHead, SkinScalp, InnerMouth and Tongue.
Setting up the materials for Michael's head is going to be very similar to the process we did to set up the materials for Michael's body. The difference is that we will be using the texture map for Michael's head instead of the one for his body and we'll be adding an "Ink" map.
To start, go to the node tree in the Material Room for the SkinHead material on the Michael 3 model:

Let's start by unplugging the Color_Math node from the Diffuse_Color socket.
We're going to use this node tree in a few minutes, so let's just move it to the side for now:

Create another Color_Math node (which will be named Color_Math_2). Set the Math_Argument to Multiply. Set both Value 1 and Value 2 to pure white.

Plug this Color_Math node into the Alternate_Diffuse socket on the PoserSurface node and set the Diffuse_Value to 0:

Create another Color_Math node (which will be named Color_Math_3). Set the Math_Argument to Step. Set Value 1 to gray (red, green and blue all set to 128) and Value 2 to pure white:

Plug this Color_Math_3 node into the Value 1 socket of the Color_Math_2 node:

Create an Edge_Blend node. Set the Inner_Color to pure white. Set the Outer_Color to pure black. Set the Attenuation to 0.4:

Plug this Edge_Blend node into the Value 2 socket of the Color_Math_3 node:

Create a Toon node. Set the LightColor to pure white. Set the DarkColor to gray (red, green and blue all set to 128). Set the InkColor to pure black. Set the Spread to 0.1 and the LineWidth to 1:

Plug this Toon node into the Value 2 socket of the Color_Math_2 node:

Plug the original Color_Math node (that we disconnected from the Diffuse_Color socket above) into the LightColor, DarkColor and InkColor sockets of the Toon node:

To set up the cel shading for the other regions in this group (EyeSocket, Lacrimal, Lips, Nostrils, SkinScalp, InnerMouth and Tongue): right-click on the PoserSurface node and then Shift-right-click on each of the other nodes, once all of them are selected, right-click on one of them and select Copy from the pop-up menu. Switch to each of the other material regions and remove the Image_Map node and then Paste the node tree into that material. Repeat for each material in this group.
Save point: Tutorial-Step7B.pzz = ???? KB
| Main Camera | Aux Camera |
|---|---|

|

|
| Face Camera | Right Hand Camera |

|

|
Step 7-C: Setting up the Cel Shading for Michael's Eyes
In this step, we are going to set up the cel shading for the materials for Michael's eyes: LCornea, LEyewhite, LIris, LPupil, RCornea, REyewhite, RIris and RPupil.
Setting up the materials for Michael's eyes is going to be virtually identical to the process we did to set up the materials for Michael's head. The only difference is that we will be using the texture map and "ink" map for Michael's eyes instead of the one for his head.
To start, go to the node tree in the Material Room for the LEyewhite material on the Michael 3 model:

Let's start by unplugging the Color_Math node from the Diffuse_Color and Specular_Color sockets. Leave the Specular_Color set to pure white and the Specular_Value at 1.
We're going to use this node tree in a few minutes, so let's just move it to the side for now:

Create another Color_Math node (which will be named Color_Math_2). Set the Math_Argument to Multiply. Set both Value 1 and Value 2 to pure white.

Plug this Color_Math node into the Alternate_Diffuse socket on the PoserSurface node and set the Diffuse_Value to 0:

Create another Color_Math node (which will be named Color_Math_3). Set the Math_Argument to Step. Set Value 1 to gray (red, green and blue all set to 128) and Value 2 to pure white:

Plug this Color_Math_3 node into the Value 1 socket of the Color_Math_2 node:

Create an Edge_Blend node. Set the Inner_Color to pure white. Set the Outer_Color to pure black. Set the Attenuation to 0.4:

Plug this Edge_Blend node into the Value 2 socket of the Color_Math_3 node:

Create a Toon node. Set the LightColor to pure white. Set the DarkColor to gray (red, green and blue all set to 128). Set the InkColor to pure black. Set the Spread to 0.1 and the LineWidth to 1:

Plug this Toon node into the Value 2 socket of the Color_Math_2 node:

Plug the original Color_Math node (that we disconnected from the Diffuse_Color socket above) into the LightColor, DarkColor and InkColor sockets of the Toon node:

To set up the cel shading for the other regions in this group (LCornea, LIris, LPupil, RCornea, REyewhite, RIris and RPupil): right-click on the PoserSurface node and then Shift-right-click on each of the other nodes, once all of them are selected, right-click on one of them and select Copy from the pop-up menu. Switch to each of the other material regions and remove the Image_Map node and then Paste the node tree into that material. Repeat for each material in this group.
Save point: Tutorial-Step7C.pzz = ???? KB
| Main Camera | Aux Camera |
|---|---|

|

|
| Face Camera | Right Hand Camera |

|

|
Step 7-D: Setting up the Cel Shading for the BodySuit
To start, go to the node tree in the Material Room for the Tank material on the BodySuit:

Let's start by unplugging the Color_Math node from the Diffuse_Color and Specular_Color sockets. Leave the Specular_Color set to pure white and the Specular_Value at 1.
We're going to use this node tree in a few minutes, so let's just move it to the side for now:

Create another Color_Math node (which will be named Color_Math_3). Set the Math_Argument to Multiply. Set both Value 1 and Value 2 to pure white.

Plug this Color_Math_3 node into the Alternate_Diffuse socket on the PoserSurface node and set the Diffuse_Value to 0:

Create another Color_Math node (which will be named Color_Math_4). Set the Math_Argument to Step. Set Value 1 to gray (red, green and blue all set to 128) and Value 2 to pure white:

Plug this Color_Math_4 node into the Value 1 socket of the Color_Math_3 node:

Create an Edge_Blend node. Set the Inner_Color to pure white. Set the Outer_Color to pure black. Set the Attenuation to 0.4:

Plug this Edge_Blend node into the Value 2 socket of the Color_Math_4 node:

Create a Toon node. Set the LightColor to pure white. Set the DarkColor to gray (red, green and blue all set to 128). Set the InkColor to pure black. Set the Spread to 0.1 and the LineWidth to 1:

Plug this Toon node into the Value 2 socket of the Color_Math_3 node:

Plug the original Color_Math node (that we disconnected from the Diffuse_Color socket above) into the LightColor, DarkColor and InkColor sockets of the Toon node:

To set up the cel shading for the other regions in this group (Crew, ForeArm, Hip, Shin, Shoulder, Thigh and TurNeck): right-click on the PoserSurface node and then Shift-right-click on each of the other nodes, once all of them are selected, right-click on one of them and select Copy from the pop-up menu. Switch to each of the other material regions and remove the Image_Map node and then Paste the node tree into that material. Repeat for each material in this group.
Save point: Tutorial-Step7D.pzz = ???? KB
| Main Camera | Aux Camera |
|---|---|
|

|
| Face Camera | Right Hand Camera |

|

|
Step 7-E: Setting up the Cel Shading for the Boots
To start, go to the node tree in the Material Room for the Cloth material on the Boots:

Let's start by unplugging the Color_Math node from the Diffuse_Color and Specular_Color sockets. Leave the Specular_Color set to pure white and the Specular_Value at 1.
We're going to use this node tree in a few minutes, so let's just move it to the side for now:

Create another Color_Math node (which will be named Color_Math_3). Set the Math_Argument to Multiply. Set both Value 1 and Value 2 to pure white.

Plug this Color_Math_3 node into the Alternate_Diffuse socket on the PoserSurface node and set the Diffuse_Value to 0:

Create another Color_Math node (which will be named Color_Math_4). Set the Math_Argument to Step. Set Value 1 to gray (red, green and blue all set to 128) and Value 2 to pure white:

Plug this Color_Math_4 node into the Value 1 socket of the Color_Math_3 node:

Create an Edge_Blend node. Set the Inner_Color to pure white. Set the Outer_Color to pure black. Set the Attenuation to 0.4:

Plug this Edge_Blend node into the Value 2 socket of the Color_Math_4 node:

Create a Toon node. Set the LightColor to pure white. Set the DarkColor to gray (red, green and blue all set to 128). Set the InkColor to pure black. Set the Spread to 0.1 and the LineWidth to 1:

Plug this Toon node into the Value 2 socket of the Color_Math_3 node:

Plug the original Color_Math node (that we disconnected from the Diffuse_Color socket above) into the LightColor, DarkColor and InkColor sockets of the Toon node:

To set up the cel shading for the other regions in this group (Sole-Bottom, Sole-Edge and Sole-Label): right-click on the PoserSurface node and then Shift-right-click on each of the other nodes, once all of them are selected, right-click on one of them and select Copy from the pop-up menu. Switch to each of the other material regions and remove the Image_Map node and then Paste the node tree into that material. Repeat for each material in this group.
Save point: Tutorial-Step7E.pzz = ???? KB
| Main Camera | Aux Camera |
|---|---|

|

|
| Face Camera | Right Hand Camera |

|

|
Step 7-F: Setting up the Cel Shading for the VersaCloak
To start, go to the node tree in the Material Room for the InnerCloak material on the VersaCloak:

Let's start by unplugging the texture map from the Diffuse_Color socket. We're going to use this Image_Map in a few minutes, so let's just move it to the side for now:

Create a Color_Math node. Set the Math_Argument to Multiply. Set both Value 1 and Value 2 to pure white.

Plug this Color_Math node into the Alternate_Diffuse socket on the PoserSurface node and set the Diffuse_Value to 0:

Create another Color_Math node (which will be named Color_Math_2). Set the Math_Argument to Step. Set Value 1 to gray (red, green and blue all set to 128) and Value 2 to pure white:

Plug this Color_Math_2 node into the Value 1 socket of the Color_Math node:

Create an Edge_Blend node. Set the Inner_Color to pure white. Set the Outer_Color to pure black. Set the Attenuation to 0.4:

Plug this Edge_Blend node into the Value 2 socket of the Color_Math_2 node:

Create a Toon node. Set the LightColor to pure white. Set the DarkColor to gray (red, green and blue all set to 128). Set the InkColor to pure black. Set the Spread to 0.1 and the LineWidth to 1:

Plug this Toon node into the Value 2 socket of the Color_Math node:

Plug the Image_Map node (that we disconnected from the Diffuse_Color socket above) into the LightColor, DarkColor and InkColor sockets of the Toon node:

To set up the cel shading for the Trim: right-click on the PoserSurface node and then Shift-right-click on each of the other nodes, once all of them are selected, right-click on one of them and select Copy from the pop-up menu. Switch to the Trim material and remove the existing nodes and then Paste the node tree into that material.
To set up the cel shading for the OuterCloak: Paste the node tree from the InnerCloak into the OuterCloak material. Delete the Image_Map that is plugged into the LightColor, DarkColor and InkColor sockets on the Toon node. Plug in the Color_Math node that multiplies the texture map and the "Ink" map together into the LightColor, DarkColor and InkColor sockets of the Toon node.. It should look like this when you are done:

Save point: Tutorial-Step7F.pzz = ???? KB
| Main Camera | Aux Camera |
|---|---|

|

|
| Face Camera | Right Hand Camera |

|

|
Continue on to Step 8: The Final Render
Jump to Step # Intro 0 1 2 3 4 5 6 7 8
![]()
![]()